The pinhole camera project has been a very interesting and quite challenging project. We started by getting our tins and making them into the pinhole cameras. By doing this, it made me realise how easy and simple it is to make a pinhole camera. Once the pinhole cameras were made we measured the width and multiplied it by the approximate diameter of the pinhole which is 0.8 millimetres to find the exposure time. After this we were shown around the dark room and we were told the process of developing the photographs we take with our cameras. This was easy to learn as the developer, stop and fixer were lined in order. Our pinhole cameras were then loaded with photographic paper while we were in the darkroom so that the paper would not prematurely be exposed. Once we were loaded up our pinhole cameras we headed out to a location we had chosen earlier. After setting up I removed the shutter and let the paper be exposed for the one minute exposure time which I had worked out earlier. Once the exposure was finished I replaced the shutter and headed back to the dark room. Once I was in the dark room I developed the photograph but it came out half black and half white. From this I learnt that the exposure time was too long. After reloading and heading back to the location to take the picture, I got better results. With a shorter exposure time of thirty seconds I had a clear image. My third shot I took had to shoot inside. I chose the library for this as the lighting was good. I exposed for three minutes and returned to the darkroom. The photograph turned out well once developed. To conclude, from this project I have learnt how to create a working pinhole camera and use it as well as how to develop photos. I have also learnt how pinhole cameras hold great significance to more modern technology such as digital cameras, films, games and even aeroplanes.
Friday, 24 September 2010
Blogging
We had to create a blog for the pinhole camera project. To do this we had to set up a Blogger account. First we made a Gmail account which gave us access to Blogger. Then we clicked on “create new blog” and we chose our backgrounds and we started adding in posts. With posts we added pictures to make the blog more interesting.
Pinhole Photography on Flickr


Pinholephotography.org
This site had quite a variety of images, such as slow light photographs which are taken over 6 months producing extraordinary images.


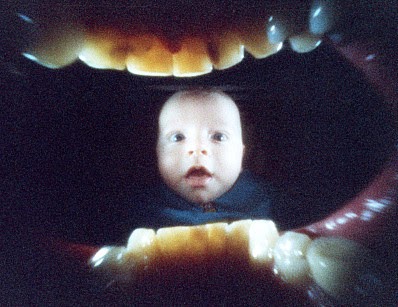
There are also photographs where the photographer had put a pinhole camera in his mouth which creates interesting images.


Pinhole.nl
This site offers a large range of stock pinhole images. All of these are categorised into different sections this ranges from portraits of people and animals to meat and landscape views from canyons.


Research
Pinhole cameras are significant to media in many ways. Without pinhole cameras we would not have digital cameras and computer games amongst others. With pinhole cameras we are able to capture images which have advanced to capturing images quicker and clearer with digital cameras. The simple use of a box and photographic paper has been minimised from a big thing into a smaller one. Making video games is easier by using captured images instead of copying and pasting repeatedly which is thanks to the pinhole camera. Pinhole cameras have had great significance in media; pinhole cameras came film reel which was used in commercial film and then from that film went digital. Pinhole cameras have even been of great use to things like aeroplanes.
Thursday, 23 September 2010
What Was Learnt
From this process I learnt how to make and use a pinhole camera. Making the camera was very simple but it was using the camera and developing which was difficult. After I had used the camera and developed a couple times the process got easier. I also learnt that the photographic paper is very sensitive to light and that movement in the photograph leads to blurring which makes a very interesting and dynamic effect.
Shooting and Developing
I put the pinhole camera down on location and opened the shutter and exposed for one minute. After closing the shutter I returned to the darkroom to develop what I had captured. First I carefully took the photographic paper out of the tin and placed it into the developer for 30 seconds, then we placed it in water to stop it overdeveloping. Then I put it in the fixer for 30 seconds to preserve the image long enough for me to check to see if it is a good photograph. After that I placed it back in the fixer for five minutes to preserve it for a lot longer. After the five minutes in the fixer I placed it in water for a further five minutes to wash. After that I dried the photograph in the drying machine.
I repeated the whole process another two times. I got varied results. My first photograph was slightly over exposed so I had to reduce my exposure time to thirty seconds. My second photograph I had reduced the exposure and it came out a lot better. My third photo I took inside in the library and I had an exposure time of three minutes and the photograph turned out better than I anticipated.
Creation Of A Pinhole Camera
To do the pinhole camera project we had to make exactly that, a pinhole camera. To start we got an average tin with a lid. We then marked where we wanted to have the pinhole on the tin, which we then drilled. Then we painted all the inside of the tin black so light would not reflect inside the tin and ruin the image but instead absorb the light. After that we taped foil to the tin with duct tape so the foil could act as the lens. We put a hole through the foil with a pin hence creating a pinhole which is the aperture. Then we created the shutter with a piece of card and more duct tape. This was important as no light could get in the tin until the picture was being taken. After that we stuck double sided tape inside the tin to hold the photographic paper. We then went inside the darkroom and had the photographic paper inserted in the tin. The tin was shut securely then was carried to the location to take the photograph.
Subscribe to:
Comments (Atom)